Why Machine Learning Pipelines?
A lot of attention is being given now to the idea of Machine Learning Pipelines, which are meant to automate and orchestrate the various steps involved in training a machine learning model; however, it’s not always made clear what the benefits are of modeling machine learning workflows as automated pipelines.
现在,机器学习管道的想法受到了广泛关注,它旨在自动化和协调训练机器学习模型所涉及的各个步骤;然而,将机器学习工作流建模为自动化管道的好处并不总是很清楚。
When tasked with training a new ML model, most Data Scientists and ML Engineers will probably start by developing some new Python scripts or interactive notebooks that perform the data extraction and preprocessing necessary to construct a clean set of data on which to train the model. Then, they might create several additional scripts or notebooks to try out different types of models or different machine learning frameworks. And finally, they’ll gather and explore metrics to evaluate how each model performed on a test dataset, and then determine which model to deploy to production.
当负责训练一个新的ML模型时,大多数数据科学家和ML工程师可能会从开发一些新的Python脚本或交互式笔记本开始,这些脚本或笔记本执行必要的数据提取和预处理,以构建一组干净的数据来训练模型。然后,他们可能会创建几个额外的脚本或笔记本,以尝试不同类型的模型或不同的机器学习框架。最后,他们将收集和探索度量,以评估每个模型在测试数据集上的执行情况,然后确定要部署到生产中的模型。

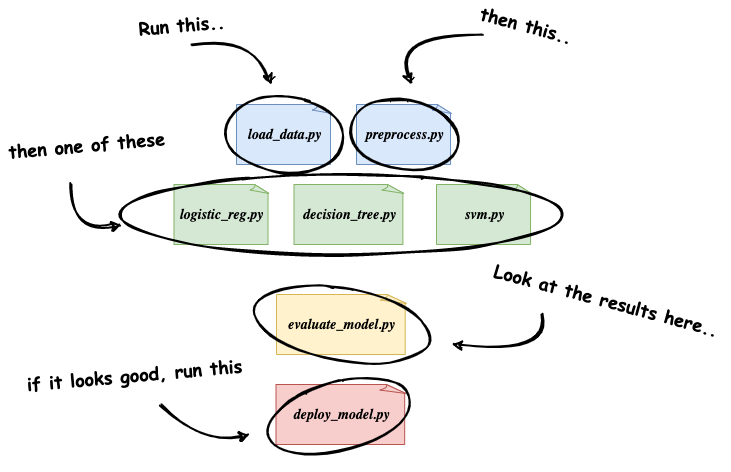
Manual Machine Learning workflow. (image by author)This is obviously an over-simplification of a true machine learning workflow, but the key point is that this general approach requires a lot of manual involvement, and is not reusable or easily repeatable by anyone but the engineer(s) that initially developed it.
手动机器学习工作流。这显然是对真正的机器学习工作流程的过度简化,但关键是这种通用方法需要大量人工参与,除了最初开发它的工程师之外,任何人都无法重复使用或轻易重复。
We can use Machine Learning Pipelines to address these concerns. Rather than treating the data preparation, model training, model validation, and model deployment as a single codebase meant for the specific model that we’re working on, we can treat this workflow as a sequence of separate, modular steps that each focus on a specific task.
我们可以使用机器学习管道来解决这些问题。与将数据准备、模型培训、模型验证和模型部署视为针对我们正在处理的特定模型的单个代码库不同,我们可以将此工作流视为一系列单独的模块化步骤,每个步骤都专注于特定的任务。

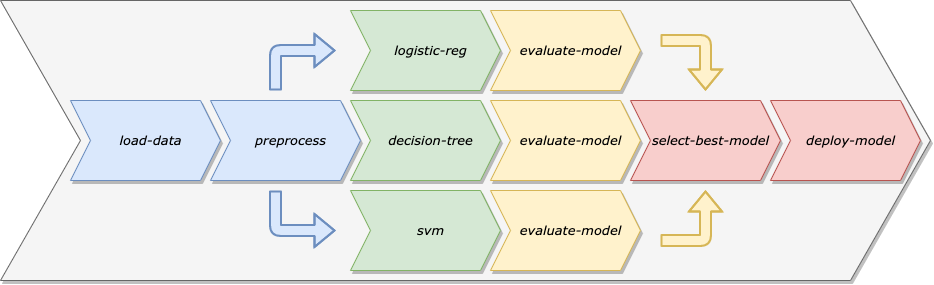
Machine Learning Pipeline. There are a number of benefits of modeling our machine learning workflows as Machine Learning Pipelines:
机器学习管道。将我们的机器学习工作流建模为机器学习管道有很多好处:
- Automation: By removing the need for manual intervention, we can schedule our pipeline to retrain the model on a specific cadence, making sure our model adapts to drift in the training data over time.
- Reuse: Since the steps of a pipeline are separate from the pipeline itself, we can easily reuse a single step in multiple pipelines.
- Repeatability:Any Data Scientist or Engineer can rerun a pipeline, whereas, with the manual workflow, it might now always be clear what order different scripts or notebooks need to be run in.
- Decoupling of Environment: By keeping the steps of a Machine Learning Pipeline decoupled, we can run different steps in different types of environments. For example, some of the data preparation steps might need to run on a large cluster of machines, whereas the model deployment step could probably run on a single machine.
What is Kubeflow?
Kubeflow is an open-source platform, built on Kubernetes, that aims to simplify the development and deployment of machine learning systems. Described in the official documentation as the ML toolkit for Kubernetes, Kubeflow consists of several components that span the various steps of the machine learning development lifecycle. These components include notebook development environments, hyperparameter tuning, feature management, model serving, and, of course, machine learning pipelines.
kubeflow是一个基于Kubernetes的开源平台,旨在简化机器学习系统的开发和部署。在官方文档中称为Kubernetes的ML工具包,Kubeflow由几个组件组成,这些组件跨越机器学习开发生命周期的各个步骤。这些组件包括notebook开发环境、超参数调优、功能管理、模型服务,当然还有机器学习管道。

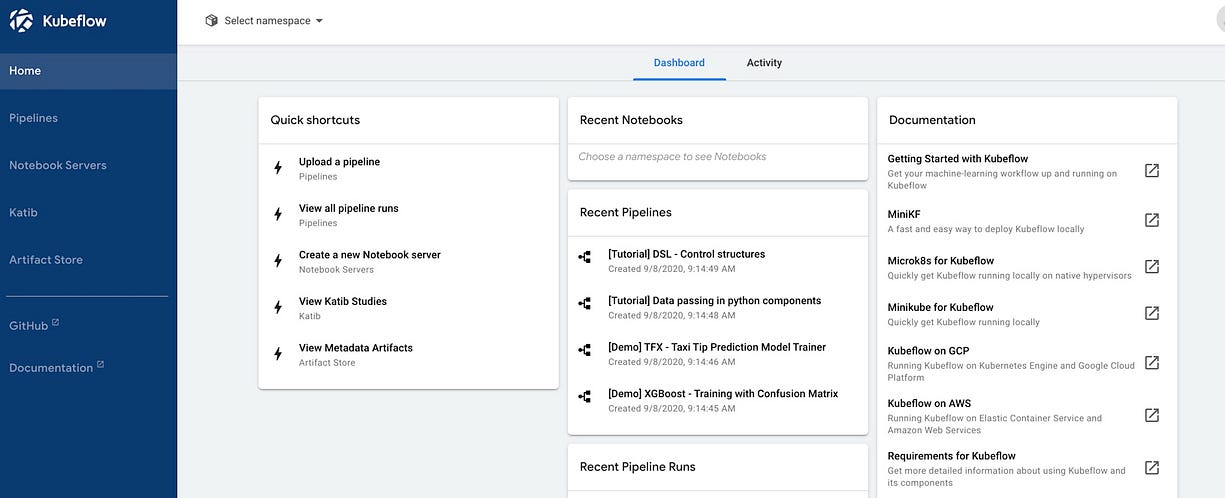
Kubeflow central dashboard. In this article, we’ll just be focused on the Pipelines component of Kubeflow.
Kubeflow中央仪表板。在本文中,我们将只关注Kubeflow的管道组件。
Environment
To run the example pipeline, I used a Kubernetes cluster running on bare metal, but you can run the example code on any Kubernetes cluster where Kubeflow is installed.
The only dependency needed locally is the Kubeflow Pipelines SDK. You can install the SDK using pip:
为了运行示例管道,我使用了在裸机上运行的Kubernetes群集,但是您可以在安装了Kubeflow的任何Kubernetes群集上运行示例代码。
本地唯一需要的依赖项是Kubeflow Pipelines SDK。您可以使用pip安装SDK:
pip install kfp
Kubeflow Pipelines
Pipelines in Kubeflow are made up of one or more components, which represent individual steps in a pipeline. Each component is executed in its own Docker container, which means that each step in the pipeline can have its own set of dependencies, independent of the other components.
Kubeflow中的管道由一个或多个组件组成,代表管道中的各个步骤。每个组件都在自己的Docker容器中执行,这意味着管道中的每个步骤都可以有自己的依赖项集,独立于其他组件。
For each component we develop, we’ll create a separate Docker image that accepts some inputs, performs an operation, then exposes some outputs. We’ll also have a separate python script, pipeline.py that creates pipeline components out of each Docker image, then constructs a pipeline using the components.
对于我们开发的每个组件,我们将创建一个单独的Docker镜像,该镜像接受一些输入,执行一个操作,然后公开一些输出。我们还有一个单独的python脚本'pipeline.py',它从每个Docker镜像中创建管道组件,然后使用这些组件构造管道。
We’ll create four components in all:
- preprocess-data:this component will load the Boston Housing dataset from
sklearn.datasetsand then split the dataset into training and test sets. - train-model: this component will train a model to predict the median value of homes in Boston using the Boston Housing dataset.
- test-model: this component will compute and output the mean squared error of the model on the test dataset
- deploy-model: we won’t be focusing on model deployment or serving in this article, so this component will just log a message saying that it’s deploying the model. In a real-world scenario, this could be a generic component for deploying any model to a QA or Production environment.


ML Pipeline Graph View. (image by author)If all this talk of components and Docker images sounds confusing: don’t worry, it should all start to make more sense when we get into the code.
Component: Preprocess Data
The first component in our pipeline will use sklearn.datasets to load in the Boston Housing dataset. We’ll split this dataset into train and test sets using Sci-kit learn’s train_test_split function, then we’ll use np.save to save our dataset to disk so that it can be reused by later components.
我们管道中的第一个组件将使用sklearn.datasets加载到Boston Housing数据集中。我们将使用Sci-kit learn的train_test_split函数将此数据集拆分为训练集和测试集,然后使用np.save将数据集保存到磁盘,以便以后的组件可以重用它。
import numpy as np
from sklearn import datasets
from sklearn.model_selection import train_test_split

def _preprocess_data():
     X, y = datasets.load_boston(return_X_y=True)
     X_train, X_test, y_train, y_test = train_test_split(X, y, test_size=0.33)
     np.save('x_train.npy', X_train)
     np.save('x_test.npy', X_test)
     np.save('y_train.npy', y_train)
     np.save('y_test.npy', y_test)

if __name__ == '__main__':
     print('Preprocessing data...')
     _preprocess_data()
So far this is just a simple Python script. Now we need to create a Docker image that executes this script. We’ll write a Dockerfile to build the image:
到目前为止,这只是一个简单的Python脚本。现在我们需要创建一个执行此脚本的Docker镜像。我们将编写Dockerfile来构建镜像:
FROM python:3.7-slim

WORKDIR /app

RUN pip install -U scikit-learn numpy

COPY preprocess.py ./preprocess.py

ENTRYPOINT [ "python", "preprocess.py" ]
Starting from the python:3.7-slim base image, we’ll install the necessary packages using pip , copy the preprocess Python script from our local machine to the container, and then specify the preprocess.py script as the container entrypoint, which means that when the container starts, it will execute our script.
从python:3.7-slim基本镜像开始,我们将使用pip安装必要的包,将预处理python脚本从本地计算机复制到容器中,然后指定preprocess.py脚本作为容器入口点,这意味着当容器启动时,它将执行我们的脚本。
Building the Pipeline
Now we’ll get started on the pipeline. First, you’ll need to make sure that the Docker image that we defined above is accessible from your Kubernetes cluster. For the purpose of this example, I used GitHub Actions to build the image and push it to Docker Hub.
现在我们将开始运行管道。首先,您需要确保上面定义的Docker镜像可以从Kubernetes集群访问。在本例中,我使用GitHub Actions 创建镜像并推送到Docker Hub。


Now let’s define a component. Each component is defined as a function that returns an object of type ContainerOp . This type comes from the kfp SDK that we installed earlier. Here is a component definition for the first component in our pipeline:
现在让我们定义一个组件。每个组件都定义为一个函数,返回ContainerOp类型的对象。这种类型来自我们之前安装的kfp SDK 。以下是管道中第一个组件的组件定义:
from kfp import dsl

def preprocess_op():

    return dsl.ContainerOp(
        name='Preprocess Data',
        image='gnovack/boston_pipeline_preprocessing:latest',
        arguments=[],
        file_outputs={
            'x_train': '/app/x_train.npy',
            'x_test': '/app/x_test.npy',
            'y_train': '/app/y_train.npy',
            'y_test': '/app/y_test.npy',
        }
    )
Notice that for the image argument, we’re passing the name of the Docker image defined by the Dockerfile above, and for the file_outputs argument, we’re specifying the file paths of the four .npy files that are saved to disk by our component Python script.
请注意,对于image参数,我们传递的是上面Dockerfile定义的Docker镜像的名称,对于file_outputs参数,我们指定由我们的组件Python脚本保存到磁盘的四个.npy 文件的文件路径。
By specifying these four files as File Outputs, we make them available for other components in the pipeline.
通过将这四个文件指定为文件输出,我们使它们可用于管道中的其他组件。
Note: It’s not a very good practice to hard-code file paths in our components, because, as you can see from the code above, this requires that the person creating the component definition knows specific details about the component implementation (that is, the implementation contained in the Docker image). It would be much cleaner to have our component accept the file paths as command-line arguments. This way the person defining the component has full control over where to expect the output files. I’ve left it hard-coded this way to hopefully make it easier to see how all of these pieces fit together.
注意:在我们的组件中硬编码文件路径不是一个很好的做法,因为从上面的代码中可以看出,这要求创建组件定义的人知道组件实现的具体细节(即Docker镜像中包含的实现)。让我们的组件接受文件路径作为命令行参数会更简洁。这样,定义组件的人员就可以完全控制输出文件的预期位置。我将其硬编码为这种方式,希望能够更容易地看到所有这些部件是如何组合在一起的。
With our first component defined, we can create a pipeline that uses the preprocess-data component.
定义了第一个组件后,我们可以创建一个使用预处理数据组件的管道。
import kfp
from kfp import dsl

@dsl.pipeline(
   name='Boston Housing Pipeline',
   description='An example pipeline.'
)
def boston_pipeline():
    _preprocess_op = preprocess_op()

client = kfp.Client()
client.create_run_from_pipeline_func(boston_pipeline, arguments={})
The pipeline definition is a Python function decorated with the @dsl.pipeline annotation. Within the function, we can use the component like we would any other function.
管道定义是一个用@dsl.pipeline注释修饰的Python函数。在函数中,我们可以像使用任何其他函数一样使用组件。
To execute the pipeline, we create a kfp.Client object and invoke the create_run_from_pipeline_func function, passing in the function that defines our pipeline.
为了执行管道,我们创建一个kfp.Client对象,并调用create_run_from_pipeline_func函数,传入定义管道的函数。
If we execute this script, then navigate to the Experiments view in the Pipelines section of the Kubeflow central dashboard, we’ll see the execution of our pipeline. We can also see the four file outputs from the preprocess-data component by clicking on the component in the graph view of the pipeline.
如果我们执行这个脚本,然后导航到Kubeflow中央仪表板的Pipelines部分中的Experiments视图,我们将看到管道的执行。通过单击管道图形视图中的组件,我们还可以看到预处理数据组件的四个文件输出。

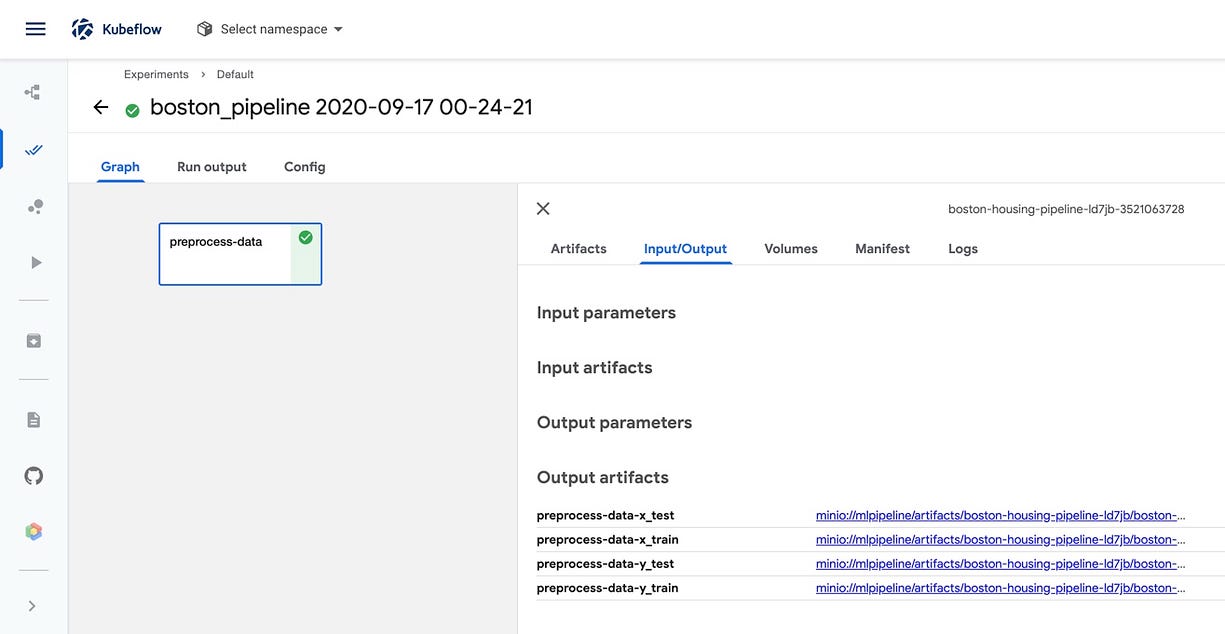
Kubeflow pipelines UI. (image by author)So we can execute our pipeline and visualize it in the GUI, but a pipeline with a single step isn’t all that exciting. Let’s create the remaining components.
Kubeflow pipelines UI。这样我们就可以执行我们的管道并在GUI中可视化它,但是一个简单步骤的管道并不是那么令人兴奋。让我们创建其余的组件。
Remaining Components
For the train-model component, we’ll create a simple python script that trains a regression model using Sci-kit learn. This should look similar to the python script for the preprocessor component. The big difference is that here we’re using argparse to accept the file paths to the training data as command-line arguments.
对于train model组件,我们将创建一个简单的python脚本,使用Sci-kit learn来训练回归模型。这应该类似于预处理器组件的python脚本。最大的区别在于,这里我们使用argparse接受训练数据的文件路径作为命令行参数。
import argparse
import joblib
import numpy as np
from sklearn.linear_model import SGDRegressor

def train_model(x_train, y_train):
    x_train_data = np.load(x_train)
    y_train_data = np.load(y_train)

    model = SGDRegressor(verbose=1)
    model.fit(x_train_data, y_train_data)

    joblib.dump(model, 'model.pkl')


if __name__ == '__main__':
    parser = argparse.ArgumentParser()
    parser.add_argument('--x_train')
    parser.add_argument('--y_train')
    args = parser.parse_args()
    train_model(args.x_train, args.y_train)
The Dockerfile, likewise, is very similar to the one we used for the first component. We start with the base image, install the necessary packages, copy the python script into the container, then execute the script.
同样,Dockerfile与我们用于第一个组件的Dockerfile非常相似。我们从基本镜像开始,安装必要的包,将python脚本复制到容器中,然后执行脚本。
FROM python:3.7-slim

WORKDIR /app

RUN pip install -U scikit-learn numpy

COPY train.py ./train.py

ENTRYPOINT [ "python", "train.py" ]
The two other components, **test-model **and deploy-model, follow this same pattern. In fact, they’re so similar to the two components we’ve already implemented, that for the sake of brevity I won’t show them here.
另外两个组件,测试模型和部署模型遵循相同的模式。事实上,它们与我们已经实现的两个组件非常相似,为了简洁起见,我不在这里展示它们。
Just like with the preprocess-data component from earlier, we’ll build Docker images out of these three components and push them to Docker Hub:
就像前面的预处理数据组件一样,我们将用这三个组件构建Docker镜像,并将它们推送到Docker Hub:
- train-model: gnovack/boston_pipeline_train
- test-model: gnovack/boston_pipeline_test
- deploy-model: gnovack/boston_pipeline_deploy
The Complete Pipeline
Now it’s time to create the full machine learning pipeline.
现在是时候创建完整的机器学习管道了。
First, we’ll create component definitions for the train-model, test-model, and deploy-model components.
首先,我们将为训练模型、测试模型和部署模型组件创建组件定义。
def train_op(x_train, y_train):

    return dsl.ContainerOp(
        name='Train Model',
        image='gnovack/boston_pipeline_train:latest',
        arguments=[
            '--x_train', x_train,
            '--y_train', y_train
        ],
        file_outputs={
            'model': '/app/model.pkl'
        }
    )
The only major difference between the definition of the train-model component and that of the **preprocess-data **component from earlier is that **train-model **accepts two arguments, x_train and y_train which will be passed to the container as command-line arguments, and will be parsed out in the component implementation using the argparse module.
训练模型组件的定义与预处理数据组件的定义与之前的定义唯一主要区别在于训练模型接受两个参数,x_train和 y_train,这两个参数将作为命令行参数传递给容器,并将在组件实现中使用argparse模块解析出来。
Now the definitions for the test-model and deploy-model components:
下面是测试模型和部署模型组件的定义:
def test_op(x_test, y_test, model):

    return dsl.ContainerOp(
        name='Test Model',
        image='gnovack/boston_pipeline_test:latest',
        arguments=[
            '--x_test', x_test,
            '--y_test', y_test,
            '--model', model
        ],
        file_outputs={
            'mean_squared_error': '/app/output.txt'
        }
    )
def deploy_model_op(model):

    return dsl.ContainerOp(
        name='Deploy Model',
        image='gnovack/boston_pipeline_deploy_model:latest',
        arguments=[
            '--model', model
        ]
    )
With the four pipeline components defined, we’ll now revisit the boston_pipeline function from earlier and use all of our components together.
定义了四个管道组件后,我们现在将重新访问前面的boston_pipeline函数,并将所有组件一起使用。
@dsl.pipeline(
   name='Boston Housing Pipeline',
   description='An example pipeline that trains and logs a regression model.'
)
def boston_pipeline():
    _preprocess_op = preprocess_op()

    _train_op = train_op(
        dsl.InputArgumentPath(_preprocess_op.outputs['x_train']),
        dsl.InputArgumentPath(_preprocess_op.outputs['y_train'])
    ).after(_preprocess_op)

    _test_op = test_op(
        dsl.InputArgumentPath(_preprocess_op.outputs['x_test']),
        dsl.InputArgumentPath(_preprocess_op.outputs['y_test']),
        dsl.InputArgumentPath(_train_op.outputs['model'])
    ).after(_train_op)

    deploy_model_op(
        dsl.InputArgumentPath(_train_op.outputs['model'])
    ).after(_test_op)
Let’s break this down:
让我们来分析一下:
- Notice on **line 6, **when we invoke the
preprocess_op()function, we store the output of the function in a variable called_preprocess_op. To access the outputs of the preprocess-data component, we call_preprocess_op.outputs['NAME_OF_OUTPUT']. - 请注意第6行,当我们调用
preprocess_op()函数时,我们将函数的输出存储在一个名为_preprocess_op的变量中。要访问预处理数据组件的输出,我们将其称为_preprocess_op.outputs['NAME_OF_OUTPUT']。 - By default, when we access the
file_outputsfrom a component, we get the contents of the file rather than the file path. In our case, since these aren’t plain text files, we can’t just pass the file contents into the component Docker containers as command-line arguments. To access the file path, we usedsl.InputArgumentPath()and pass in the component output. - 默认情况下,当我们从组件访问
file_outputs时,我们得到的是文件的内容,而不是文件路径。在我们的例子中,由于这些不是纯文本文件,我们不能仅仅将文件内容作为命令行参数传递到组件Docker容器中。为了访问文件路径,我们使用dsl.InputArgumentPath()并传入组件输出。
Now if we create a run from the pipeline and navigate to the Pipelines UI in the Kubeflow central dashboard, we should see all four components displayed in the pipeline graph.
现在,如果我们从管道创建一个管路并导航到Kubeflow中央仪表板中的管道UI,我们应该可以看到管道图中显示的所有四个组件。

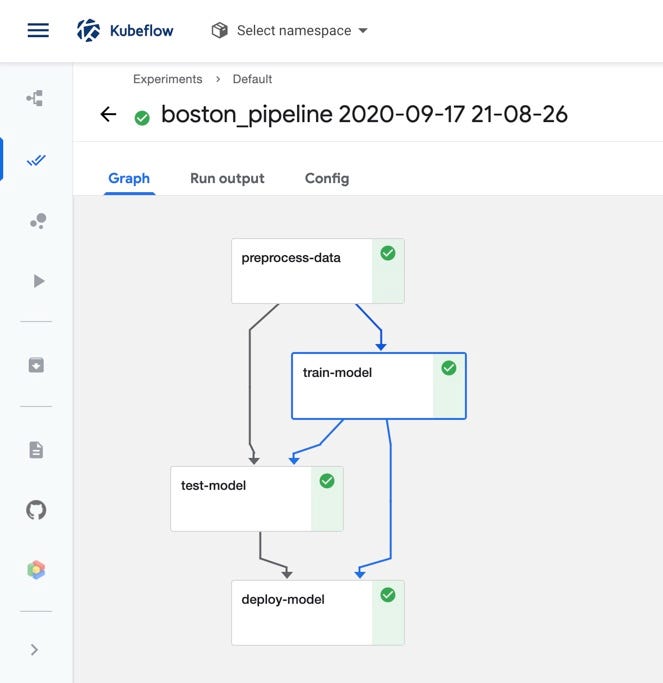
Kubeflow pipelines UI.
Conclusion
In this article, we created a very simple machine learning pipeline that loads in some data, trains a model, evaluates it on a holdout dataset, and then “deploys” it. By using Kubeflow Pipelines, we were able to encapsulate each step in this workflow into Pipeline Components that each run in their very own, isolated Docker container environments.
在本文中,我们创建了一个非常简单的机器学习管道,它加载一些数据,训练一个模型,在坚持数据集上对其进行评估,然后“部署”它。通过使用Kubeflow管道,我们能够将此工作流中的每个步骤封装到管道组件中,每个组件都在各自独立的Docker容器环境中运行。
This encapsulation promotes loose coupling between the steps in our machine learning workflow and opens up the possibility of reusing components in future pipelines. For example, there wasn’t anything in our training component specific to the Boston Housing dataset. We might be able to reuse this component any time we want to train a regression model using Sci-kit learn.
这种封装促进了机器学习工作流中各个步骤之间的松散耦合,并为将来在管道中重用组件打开了可能性。例如,我们的训练组件中没有任何特定于波士顿住房数据集的内容。我们可以在任何时候使用Sci-kit learn学习训练回归模型时重用该组件。
We just scratched the surface of what’s possible with Kubeflow Pipelines, but hopefully, this article helped you understand the basics of components, and how we can use them together to create and execute pipelines.
我们只是初步了解了Kubeflow管道的可能性,但希望本文能帮助您了解组件的基础知识,以及如何将它们结合起来创建和执行管道。
If you’re interested in exploring the whole codebase used in this article, you can find it all in this GitHub repo: https://www.aiqianji.com/openoker/kubeflow-pipelines
如果您对探索本文中使用的代码感兴趣,您可以在https://www.aiqianji.com/openoker/kubeflow-pipelines中找到所有内容。